
At the beginning of this trimester Shay Mitchell, Jaxon Arundall and myself decided we would embark on recording footage and sound to be used to create a documentary for Brisbane punk band ‘Whiskey and Speed‘, who after ten years are calling it a day. This would be our first foray into film making, working closely with a final tri film student who would be teaching us the basics of on location filming and then editing the footage we had. We would provide all the sound required in the form of ADR, Foley and Sound design, then placing these assets into the final production. It was an ambitious undertaking as none of us have ever worked on a project of this magnitude and one that would require the development of many new skills we have not been formally trained for.
My first experience was to be interviewing the lead singer and guitarist of the band in the film studio at SAE and was an amazing introduction to what goes into getting everything right when it comes to filming and also recording the audio in a film studio environment. I was charged with looking after the recording of the audio, whilst my colleague Shay would be asking the interview questions and ensuring the subjects were relaxed and feeling comfortable to open up about their experiences.
My initial surprise upon arriving an hour before the band members were booked was just how much equipment is used in a task like this! Numerous lights, miles of cabling and all the camera gear made for a torrid and confusing time as we eagerly tried to assist the film maker get everything set up in front of the green screen without a clue of what was happening. For the sound recording in comparison, our gear seemed a lot simpler despite never having used it before.
Our sound recording gear
For this interview we had the following:
- F8 Zoom Multitrack Field Recorder unit
- Sennheiser G3 wireless lapel set &
- Sennheiser MKH 4167 Shotgun Boom Mic
This was my first experience using this audio equipment but fortunately these are items regularly used on film sets and Shay had also had some experience working in an on location situation assisting one of the film teams before
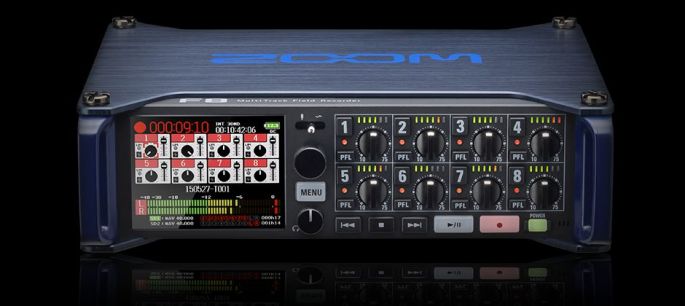
The first step in preparing the Zoom F8 was to wipe the SD memory cards (2), and factory reset the unit. This ensures that you have enough space to record your audio on the memory cards and resets any settings the previous user had in place. The sample rate and bit depth were then programmed to 48Hz and 24bit respectively which was enough to get a good quality recording but not chew up too much memory.
The unit has an amazing feature called ‘Dual Channel Recording Mode (more here), which enables the user to record ‘safety tracks’ on inputs 1 – 4. This feature means that despite the unit having a digital limiter designed to prevent clipping before it occurs in a recording, you can employ two independent recording inputs both gained at different levels. This will allow one input to collect the quieter parts of the recording by being gained higher, whilst the other can be used if the initial input (due to being gained higher), clips when the subject sound source modulates in amplitude too drastically. I found this feature invaluable, particularly in an interview environment as the dynamic range of both subjects was quite wide dependent on what topics were being discussed! Essentially, now we have two separate recordings of the same signal where one can replace the other in any areas where digital clipping occurs.
Because the unit also has two SD cards we set them both up to receive the recording so that we had a backup if anything went array with one of the cards. We also set up another feature on the unit which is the ‘Pre-Record’ function. This tells the device to save 6 seconds of content before you actually hit the record button! Whilst not critical in this interview environment where we were essentially letting the tape run constantly in order to capture any little pearls of wisdom said off camera, I can see how helpful this would be in a film setting.
 We set the boom mic up on a stand as the position the interview subjects (seated was pre-set and also used the Sennheiser Lavalier mic and transmitter/receiver units to record the interview. This way we had two different recordings using two separate recording devices of the same signal. Later in post production we can choose between these or blend the two depending on what suits the interview best.
My time was spent monitoring the recording signals of the four inputs using headphones and adjusting levels where necessary. These adjustments were minimal once we had the initial levels for each subject which were obtained pre interview using the initial banter taking place in order to get the interviewees comfortable. Each interview went for about an hour using questions tailored to each subject that we had prepared earlier. Packing up the film set was just as laborious as setting up it up and I thought us audio guys had it rough!
We got some great content for use in our documentary and I felt I did a really great job of using the on location audio equipment considering it was my first time! The F8 field recorder is an amazing little unit, feature packed, with an intuitive interface and very powerful for its compact size. I look forward to the opportunity of using this device again for future interviews that will be conducted both in the studio and on site at pending live events.
